Brawl Hero Beginner Guide
Applicable link:
https://gameres.netgamex.com/h5game/brawl-hero/index.html
1. Basic Controls: Learn to Move First, Then Learn to Stop

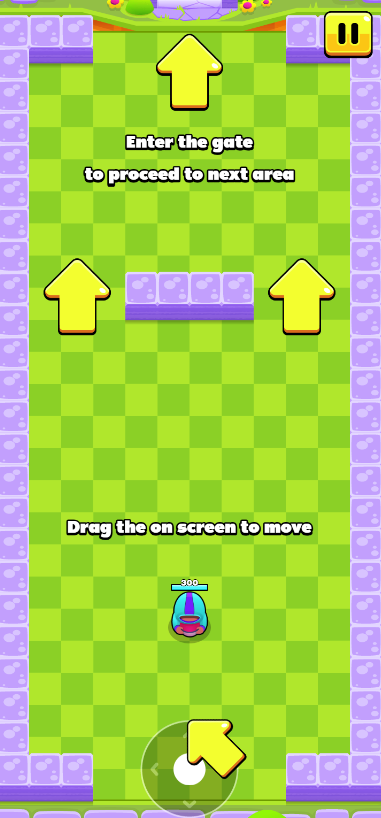
When you enter the game, you will see the tutorial screen:
A virtual joystick at the bottom
A yellow arrow in the center telling you to move upward and pass through the gate to the next area
There are only two core points:
Hold the joystick → your character moves
Release the joystick → your character stops and auto-attacks
This means you only need to handle movement. Aiming and shooting are done for you automatically.
2. You Only Shoot When Staying Still: Stopping = Damage Output

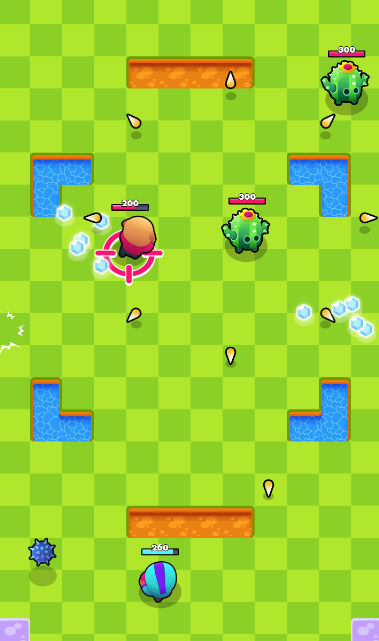
The second tutorial image tells you:
“Release the joystick — Stand still to shoot at enemies.”
In simple words:
Don’t run around all the time. If you want to deal damage, you must stop moving.
Many beginners panic and run everywhere. The result:
You barely shoot anything
Enemies keep pushing toward you
Eventually you get surrounded and die
The correct pattern is:
Move to dodge → find a safe spot → release the joystick → auto-attack → move again when enemies get close
Once you get used to “move a bit → stop a bit,” the difficulty drops dramatically.
3. Movement Strategy: Don’t Stand in the Center; Let Enemies Come from One Direction

From your screenshot, you can see:
A green grid map
Water pits, walls, lava blocks, etc.
Cactus shooters, charge-type monsters, etc.
The recommended playstyle:
1) Fight near the edges, not the center
Standing in the middle =
Enemies coming from all directions + harder bullet reading = easiest way to die.
Fighting near walls lets you:
Limit enemy approach to 1–2 directions
Read their attack angles better
Retreat safely when needed
2) Use terrain to “block” enemies
Water pits, walls, and gaps all block monsters:
Stand behind terrain
Monsters must walk around
You get extra time to stop and fire safely
Narrow corridors or U-shaped walls are especially effective.
3) Kill fast-moving enemies first
Priority:
Charging/close-range attackers (most dangerous)
Ranged shooters
Slow tank monsters
4. Levels and EXP Bar: Don’t Forget to Go Back and Pick Up EXP

The purple bar on the top right is your EXP bar.
Monsters drop yellow crystals
Walk over them to absorb EXP
When the bar fills → level up → select a new skill
Tip:
After clearing a wave, go around and pick up all EXP before moving on.
Leveling faster means forming your build sooner → the later stages become much easier.
5. Which Skills to Pick? A Safe “3-Step Plan” for Beginners

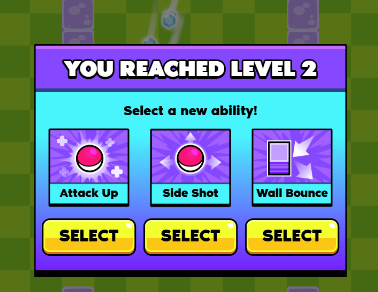
After reaching Level 2, you’ll see options like:
Attack Up
Side Shot
Wall Bounce
Skill choices greatly influence difficulty later.
Step 1: Always take “Attack Up” first
Reason:
Low damage = cannot kill
Cannot kill = enemies pile up
Piled-up enemies = guaranteed death
Beginners should pick Attack Up 1–2 times if possible.
Step 2: Add coverage tools (Side Shot, Multi-shot, Piercing)
Side Shot is excellent in mid-game:
Shoots left and right simultaneously
Clears side enemies while focusing forward
Works very well when enemies start swarming
If you see Multi-shot, Spread Shot, Piercing later, follow this logic:
After securing basic damage → pick multi-direction / multi-projectile → ignore fancy effects for now
Step 3: Wall Bounce is map-dependent
Wall Bounce is strong on maps with:
Corridors
Tight corners
Heavy obstacles
But still, only pick it after your damage is stable.
6. Game Flow: Play by Stages (Beginner-Friendly)
You can divide a full run into three simple phases:
Early Game (Lv. 1–5): You must fix “damage output” first
Pick Attack Up
Pick Attack Speed / Range / Projectile Speed
Goal: kill small enemies in 2–3 hits
Mid Game (Lv. 6–10): Start improving “crowd control”
Multi-shot
Side Shot
Piercing
Spread Shot
As long as your bullets can hit more enemies, you’ll quickly stabilize.
Late Game (Lv. 10+): Pick whatever feels fun
Because by now:
You deal enough damage
Your range and coverage are good
You won’t easily die unless reckless
So feel free to choose:
Critical
Explosion
Bounce
Freeze
Any special effect you enjoy
7. Five Beginner Mistakes (Avoid These and You Will Survive Much Longer)
Running nonstop → no damage → enemies accumulate → instant death
Correct: move → stop & shoot → move → stop & shoot
Ignoring Attack Up and choosing only flashy skills
Cool effects are useless without basic damage
Standing in the center of the map
Center = the most dangerous place
Panicking when enemies swarm, refusing to stay near walls
Edges + terrain make dodging easier
Ignoring enemy types
Chargers = top priority
Ranged = dodge diagonally
Tanks = kill last
8. A Beginner-Friendly “Universal Build” (Copy This and You Win)
If you don’t want to think too much, use this set:
Early:
Attack Up
Attack Speed
Range
Projectile Speed
Mid:
Side Shot
Multi-shot
Piercing
Spread Shot
Late (optional, pick what you like):
Critical
Explosion
Bounce Shot
Freeze
This build is stable, strong, and extremely forgiving.
